Torani Kulda, M12-L Kimogila

Let's start with something strong but not game-breaking. Torani seems pretty straightforward at first glance. Her ability got an upgrade since you can't remove 0 green tokens to avoid it anymore, but two things make her much more interesting in 2.0. First, the return of swarms increases the chance of catching multiple ships in her bullseye arc. Second and more importantly, Torani now has an easy way to trigger her ability twice in one turn.

Yup, Cluster Missiles attacks twice, so it lets Torani trigger her ability twice. Obviously, twice is better than once. Most ships can handle taking one extra damage or removing one green token to avoid it. Few ships will have two green tokens to remove, and taking two extra damage in one turn is a big problem for most ships.
This combo is cheap, coming in at 55 points. For 3 more points, R3 Astromech gives you more flexibility and power with the Cluster Missiles. R5-TK is a janky alternative which gives you the option to shoot your own ships if your opponent tries to avoid double-taps by spreading out. Reddit user Alexij suggested using Munitions Failsafe with R5-TK. It counts as making an attack, but the attack on your own ship is guaranteed to miss and you conserve your charges.
Static Discharge Vanes

(Static Discharge Vanes got a Pre-Day-0 errata so it can't be used while stressed.
Spoiler alert: that might not be its last errata.)
If you play deck-building games long enough, you'll probably come across a fundamental rule of game balance. Some strong abilities will be balanced by making you suffer a strong drawback. Effects which prevent you from suffering the drawback are good. Effects which flip the drawback onto your opponent are really good and should be priced accordingly.
There are abilities in X-Wing which are balanced by a drawback of giving you a jam token (meh) or an ion token (harshest effect in X-Wing). Static Discharge Vanes prevent those drawbacks. Static Discharge Vanes makes your opponent suffer those drawbacks. Static Discharge Vanes costs 6 points and can be taken by most ships in the game.
If you're not convinced (and that's fair, because I haven't seen this card mentioned at all before), let's consider all of the cards which have jam or ion as a drawback and see how Static Discharge Vanes breaks them.
We'll start with an appetizer: a fun, wholesome combo that makes a bad card decent.

Taking Static Discharge Vanes with Freelance Slicer means half the time, you can jam two enemy ships if you take a stress. Jam is much weaker in 2.0 than in 1.0, but if only its drawback happened all the time, Freelance Slicer might be worth taking. That should be the first sign that something has gone horribly wrong.
Now, let's pair Static Discharge Vanes with a good card that has a strong drawback.

For 9 points and two upgrade slots, Static Discharge Vanes with 4-LOM says "When attacking a ship in range 1, you may gain 1 stress and 1 ion token. If so, the defender receives 1 ion token and can't spend a type of green token this attack." None of that "has to hit" or "spend a green token to avoid it" 2.0 stuff, just take the ion.
That sounds really good! I'd play it even if it didn't disable the green token. In other words, I'd play this combo if the entirety of the 4-LOM card said "While you perform an attack, you may take two ion tokens."
I'd play 4-LOM if it only had a drawback and no positive effect. Something has gone horribly wrong.
Now, let's break the game.

Yup. If your ship has Static Discharge Vanes and Feedback Array and catches a small ship in a head-on bump for just one turn, it locks that ship in place forever while burning it down.

You can even combine the two combos, where you also take 4-LOM to ion them at range 1 and make sure they bump next turn. If you miss the 1.0 range-1 death-zone, it's actually back and better than before!
There were some ships in 1.0 which do similar things (e.g. Captain Oicunn with Ion Projector and Emperor Palpatine, U-Wing with Ion Projector and Anti-Pursuit Laser), but they were more than half your list or much less reliable. The Feedback Array + Static Discharge Vanes combo costs just 10 points and can go on any ship with both an illicit and modification slot.
Let's pretend Static Discharge Vanes won't get nerfed into the ground and discuss good ships to use this combo on. The drawback of Feedback Array is it also hurts you, so you want something with high health. The generic Scum Falcon is probably the best option. It has a large base and 11 health, and costs only 56 points with these upgrades. Dalan Orberos in the medium-base Kimogila is also an interesting option at 58 points, since you can use his ability and R2 Astromech (+6 points) for more damage and extra health. Rebels can also take advantage of this combo with the generic Partisan Renegade U-Wing at 53 points.
If taking the ion token is required for the damage to trigger, your ship's hit points are no longer a concern. You can take a generic Z-95 pilot for 34 points, or upgrade to a Jakku Gunrunner for 38. The Scum Falcon is still a good option at 56 points. Similarly, Rebels can use Cavern Angel Zealot X-Wings instead for 51 points, but the Partisan Renegade U-Wing is still probably the better option at 53.
Besides turning your upgrade cards' drawbacks into your opponent's drawbacks, Static Discharge Vanes also turns one of the worst crit effects into one of the most hilariously beneficial effects I've seen if enemy ships are close-by. This is way better than drawing Damaged Cockpit on 1.0 bombers. I don't even know how many points I'd pay to have this crit every game.

Fortunately, Static Discharge Vanes has a counter which protects your ships from ion tokens. It's Static Discharge Vanes.
Don't be surprised if Static Discharge Vanes gets another errata (maybe before the game officially releases?) and/or if its point cost triples (I'll take the over). One candidate for an errata is not working on friendly effects which grant you the ion token. It's probably too late to add charges to this card.
Let's hope they fix this before Coruscant. (Or hope no one reads this article.)
Sigma Squadron Ace, TIE/ph Phantom

Alright, let's step back from breaking the game and just talk about strong but mostly fair options.
Whisper's still a popular pilot, but now that TIE Phantoms lost their 4 attack, they seem to be flying under the radar (har har). If you look carefully though, their base chassis is actually very good. The cheapest generic costs3 more points 1 more point than the same-PS X-Wing for essentially the same stat-line once their free evade is included (technically a better statline because the evade is a shield), and they have cloaking on top of that. They have built-in pseudo-regen by running away and evade -> cloaking to refresh their free evade. Their ship ability also gives them amazing synergy with Juke.
Whisper's still a popular pilot, but now that TIE Phantoms lost their 4 attack, they seem to be flying under the radar (har har). If you look carefully though, their base chassis is actually very good. The cheapest generic costs

Elite generics are often overlooked, but the Sigma Squadron Ace with Juke costs exactly 50 points. Juke gets stronger with higher initiative and more copies. You can fit four of these ships in a list, and while they'll usually shoot after aces, they'll often shoot before swarms at initiative 4. It should be lots of fun to fly. This is the list I'm most interested in trying out for 2.0.
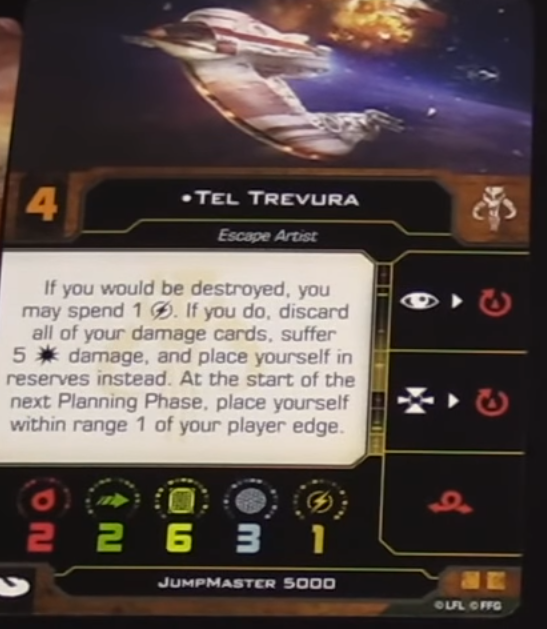
Jumpmaster 5000 with Punishing One

This is probably "merely" balanced, but it still seems to be heavily underrated. The Jumpmaster 5000 is obviously much worse than it was in 1.0, and that's OK because it was nuts in 1.0. Forget all of that. It's no longer crazy strong in 2.0, but it's probably not as weak as people have been saying. Just pretend the 2.0 Jumpmaster with the Punishing One title is a front-arc only, 3-attack ship with 2 agility and 9 health. The generic Jumpmaster is 4 points cheaper than the generic Lancer-class Pursuit Craft, roughly the value of the 2 health for 1 shield. The Lancer-class has an extra turret arc, but the Jumpmaster has linked actions for rotating its arc. Similarly, Wedge with a hypothetical 2x Hull Upgrade and 1x Shield Upgrade would cost 68 points, which is only 4 points less than Dengar with Punishing One.

The builds to consider include just slapping Fearless on Dengar at 75 points (R3 Astromech or R5-P8 are also good options), Tel Trevura either light or with Hull Upgrade and/or R2 Astromech for 68-79 points, or just the generic Jumpmaster at 60 points.
Esege Tuketu, BTL-S8 K-Wing

Is he good? Is he meh? Is he overpowered? I'm not sure, but Esege reminds me of Manaroo now that his ability works on defense.
The first iteration of Dengaroo saw Manaroo with Recon Specialist and Dengar with R5-P8. Dengar eventually moved to Overclocked R4, but the original version was still pretty strong. The moral of that story is giving a 2-agility ship even two focus tokens a turn is pretty good.
Manaroo's ability was nerfed to range 1 and she mostly disappeared from the game after the Mindlink nerf. Esege's ability works within range 2 -- will that be enough? He's pretty affordable at 60 points with Perceptive Co-Pilot and has the option to take bombs to deter pursuit, Advanced SLAM for more speed, and Barrage Rockets for some offense.

Manaroo had Dengar to support, and the Rebel version of Dengar is Dash. Despite different playstyles, Dash is similar with a big attack and two agility to make good use of the extra tokens. He also likes playing around obstacles and will often enjoy extra green dice.
This synergy isn't the strongest, because 1.0 Dash did prefer to fly alone and this combo doesn't work so well with Bistan gunner. Still, it's probably worth a try.
I don't think Rebels have the aces to fly a "Manaroo Aces"-style list (maybe Corran + Jake/Arvel?), but Esege might work to enable an efficient jousting list. Unlike Benthic Two-Tubes, he doesn't have a native 3-dice attack or combo with Edrio Two-Tubes. However, his focus tokens go where they are needed, and his flexibility give him special synergy with some ships.
The largest synergy is with Red Leader Garven Dreis in either the ARC-170 or the T-65 X-Wing. Esege effectively gives Garven infinite focus tokens at range 2.

Shara Bey also likes more focus tokens, especially if she has R3 astromech to use her ability for both offense and defense.
The first iteration of Dengaroo saw Manaroo with Recon Specialist and Dengar with R5-P8. Dengar eventually moved to Overclocked R4, but the original version was still pretty strong. The moral of that story is giving a 2-agility ship even two focus tokens a turn is pretty good.
Manaroo's ability was nerfed to range 1 and she mostly disappeared from the game after the Mindlink nerf. Esege's ability works within range 2 -- will that be enough? He's pretty affordable at 60 points with Perceptive Co-Pilot and has the option to take bombs to deter pursuit, Advanced SLAM for more speed, and Barrage Rockets for some offense.
Manaroo had Dengar to support, and the Rebel version of Dengar is Dash. Despite different playstyles, Dash is similar with a big attack and two agility to make good use of the extra tokens. He also likes playing around obstacles and will often enjoy extra green dice.
This synergy isn't the strongest, because 1.0 Dash did prefer to fly alone and this combo doesn't work so well with Bistan gunner. Still, it's probably worth a try.
I don't think Rebels have the aces to fly a "Manaroo Aces"-style list (maybe Corran + Jake/Arvel?), but Esege might work to enable an efficient jousting list. Unlike Benthic Two-Tubes, he doesn't have a native 3-dice attack or combo with Edrio Two-Tubes. However, his focus tokens go where they are needed, and his flexibility give him special synergy with some ships.
The largest synergy is with Red Leader Garven Dreis in either the ARC-170 or the T-65 X-Wing. Esege effectively gives Garven infinite focus tokens at range 2.

Shara Bey also likes more focus tokens, especially if she has R3 astromech to use her ability for both offense and defense.

Just giving her more focus tokens could be wasted until she gets shot. Esege's flexibility gives her the extra focus tokens when she needs it and frees them up for other ships if she doesn't.
Now that Miranda's nerfed into the ground, Esege is probably the best K-Wing pilot. Is that enough for him to see play? We'll find out!
One last aside on variable costing
Variable costing is probably one of the best ideas in X-Wing 2.0. It has a complexity cost, but it's the only way some upgrades can be balanced for all different types of ships. In fact, FFG should probably use variable costing more often.The biggest priority is secondary weapons. When you're shooting a secondary weapon, you're not shooting that primary weapon you paid for. That's great for 2-attack ships, but much worse for everyone else. This is probably why the TIE Bombers and TIE Punishers seem so strong.
I'd also like to see them add variable costing to action-efficiency upgrades based on the number of dice a ship has and possibly also its total health (e.g. attack + agility + health/5 round down). Action efficiency upgrades get better as the ship has more dice, and repeated-use ones get better when the ship has more health. This can come with a reduction in the point cost of ships with lots of dice, because they are generally overcosted without action-efficiency upgrades.
That's all for me. If you think there's another strong ship or upgrade card that's been flying under the radar, let me know!


